Sanctum of the Last Flame
Map: Sanctum of the Last Flame
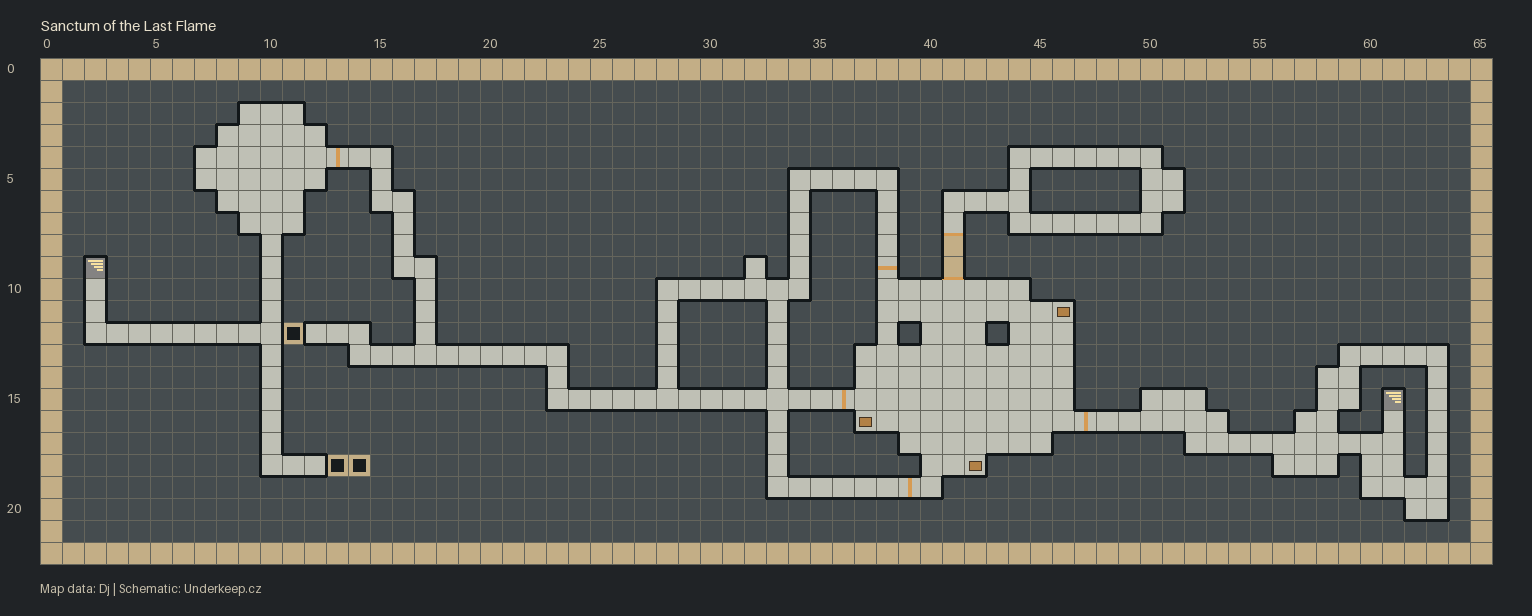
There are two ways in from Duskhollow Woods: the secret western entrance (2,9) and the main cave in the dragon's territory (61,15). The western side starts you on a rune-plate puzzle; the eastern one drops you closer to the lair. Bring supplies for a long stay – at the lair door you can trigger a solo fight that you can't walk out of.
Talk to both Korr and Durok at the dwarven camp before you set off. If you want to spare the dragon, you need Durok's quest Heart of the Mountain.
Rune plates and the looping corridor
Five rune plates stand in the western part – Crown, Eye, Fire, Serpent and Tree – with a sign above them (10,2): five stones guard the sage's wisdom, the Crown rises twice as high as the Flame, two steps beyond the Eye waits the Serpent, the Tree and the Flame together match the Serpent's hunger, the Eye stands above the Crown, begin with the lowest and end with the highest. That makes the values Fire 1, Crown 2, Eye 3, Tree 4 and Serpent 5. Step on them in the order Fire, Crown, Eye, Tree, Serpent (10,4). The door to the east opens and you get 100 XP. If you misstep, use the lever to reset the plates.
Further east a corridor seems to go nowhere: a hidden teleport keeps sending you back west (30,15). Don't hunt for another turning, hunt for a button. The hidden button (26,15) opens two secret walls and ends the loop. A lever a few tiles on (35,15) opens the door to the east.
Korr, barrels and how the dragon ends up
Korr sets up explosives at three spots before the lair (33,14; 38,7 and 36,19). If you want the dragon spared, pick Try to reason with Korr at each one. He gives in at the third, and you go into the fight without explosives.
In the lair itself (41,15) you have two options. Kill the dragon, or break the five Cave Pillars (44,16): the ceiling collapses and the dragon escapes alive. The pillars wake up during the fight with Korr, so plan for them as well. Once the dragon escapes, the collapsed rocks further east fall away (54,17).
The dragon's hoard (42,14) holds a Diamond, Emerald, Garnet, Amethyst, Ham, about 40 coins and the Third Runic Segment – skip the lair and you'll be one of the four tower segments short.
A lever works the lair door (48,16), and watch one thing here: step through that door on your own and the solo fight starts with the door shutting behind you.
The hidden library and the lair's loot
A hidden button on the south wall (39,12) opens a pair of secret walls, and a second button opens the narrow passage into an old library (41,9). Behind the collapsed stone a passage reveals itself, with faint blue lights emerging from the darkness – dim, steady, still burning after centuries. Their glow doesn't belong to the dragon's lair; the place was here long before the dragon ever arrived. Inside you'll find an Archmage Hat in an alcove (49,5) and, on pedestals, the Ancient Book: The Four Who Bear the Key and the Ancient Book: The Dragon Warden (51,5).
Otherwise search everything around the lair: a chest with Mindstep Sandals (37,16), a chest with Moonsteel Ore (46,11), a locked chest needing Lockpick Tools with random loot (42,18), a sarcophagus with a Shaman Wrap (40,10), an urn with 6 coins (43,10), a Ruby in the garbage (45,17) and more garbage holding a Potion of Stamina, Potion of Mega Healing, Potion of Resurrection and the Recipe: Potion of Resurrection (38,10). Alcoves hold an Embersand Saber (43,12), two Golden Ore (44,18) and a set of a Potion of Mana, Mindwell Elixir, Warblood Tonic and Potion of Poison (37,12).