
Mausoleum
Map: Mausoleum
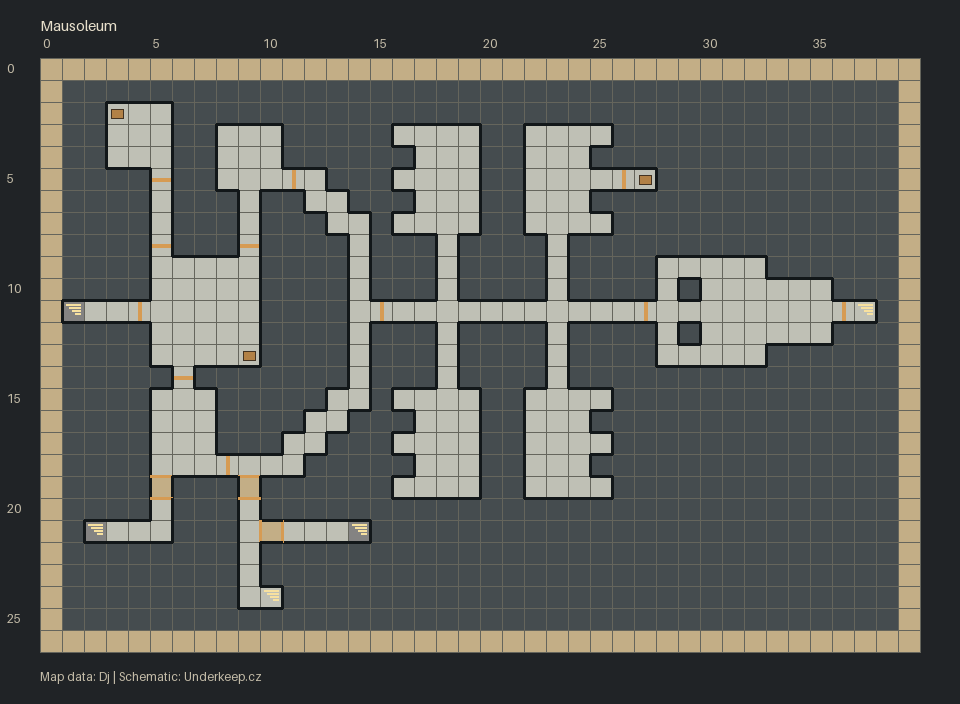
Two entrances lead from Underkeep Cemetery into the mausoleum, both on the western side of the map. The main one drops you into a hall where a group of Crimson Sleepers stands around a coffin on an altar. Don't open that coffin before you've dealt with them: opening it releases another enemy, and you'll be fighting it alongside the rest of the room. Once the hall is clear, check the barrel and crate nearby for Moldy Bread, an Apple and two Potion of Minor Healing, and pick up the Rusty Dagger lying on the floor a few rows south. The second cemetery entrance comes out in that same lower section, so the two routes meet quickly.
What to pick up in the halls
The mausoleum is mostly a long run of halls with alcoves and sarcophagi, and it's worth clearing all of them. In the west there's a chest with the Helm of Striking, Ham and 4 coins, and a pair of Leather Gloves on the floor of the northern corridor. The alcoves above them hold a Rat Ration and Moldy Bread, plus a single Voidshard.
Mid-map you'll find an alcove with a Potion of Minor Mana, an Ironhide Potion and a Chain Helmet, and a sarcophagus above it holding the Cloak of Firespark. Further east the small finds pile up: a Rusty Longsword, Rat Ration, the recipe for Potion of Stamina and 6 coins on the floor, a Ring of Minor Health in a southern sarcophagus, and Lockpick Tools in an eastern alcove. Keep those tools – a locked chest that needs them waits later, in Caerlin Woods.
The scroll behind the grate and the summoning circle
The Scroll of Binding chest stands behind a grate in the north. A hidden switch in the corridor west of the chest, near (24,6) on the map, opens the way. At the end of the webbed passage, face the closed gate and examine the banner on the right-hand wall: it conceals a small button. We have not confirmed the exact connection between these two landmarks.
The scroll belongs with the summoning circle and its glowing book on a pedestal in the north of the mausoleum, east of Maltherion's chamber. Reading it reveals the name Ixarion. Go back to the book and the altar, summon Ixarion the Bloodbound Herald and beat him to bind him. After that he attacks automatically at the end of your turns, but only here in the mausoleum, and he is not a fifth party member. Leaving the underground ends his help for good, so it's fine to save the ritual for a trip when you don't plan to go back up.
At one doorway in the mausoleum, a flame conceals another switch. Extinguishing it exposes the control, but we have not confirmed the exact doorway or how to put out that flame.
Maltherion and the first Golden Key
A skull door leads into Maltherion's chamber in the north-west. Inside waits Maltherion the Sleepless Watcher and his Golden Key of Maltherion, the first of the three keys for the Source Gate. Expect heroes to be frozen during the fight and keep topping up the rest of the party. With him down he leaves a Staff of Ice Crystals; then search the area for a Potion of Minor Mana on the table, 1 coin on the bed, and a chest with the Belt of Bull, a Potion of Mana and 7 coins.
The sign, the trap and the Skeleton King
The eastern corridor starts with a wall sign about something clad in bone that spares blood-marked souls and speaks of a circle forged and crimson bound. We have not confirmed how to obtain the mark, so come prepared to fight. A few tiles past the sign the doors shut behind the party and the way back is sealed.
At the far end stands the Skeleton King, who leaves behind the Kingbreaker Blade. This is an optional encounter: you can walk past him to the exit of his chamber. If you want the weapon, fight him – and if you withdraw to the neighbouring area to rest, damage already done to him may still be there, though don't count on it. The blade doesn't replace any of the keys you need later.
From here the route continues into Cells of the Forgotten through two exits: one at the eastern end of the corridor beyond the Skeleton King, the other in the south of the mausoleum.