
Cells of the Forgotten
Map: Cells of the Forgotten
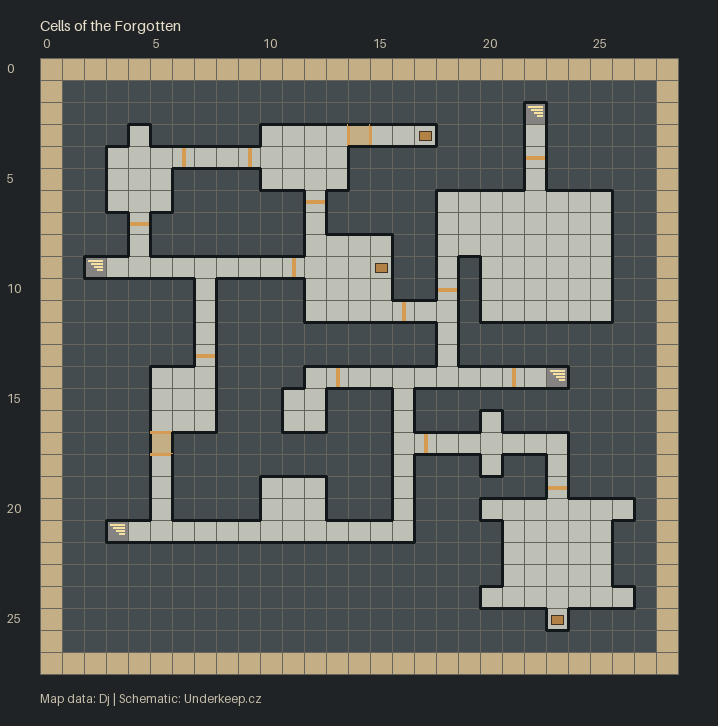
Two exits from the mausoleum lead down here, one in the north and one in the south, and both come out along the western wall of the level. Crimson Sleepers patrol the corridors and cells, so pull them apart into smaller fights. Along the western wall the alcoves and barrels are worth a look: Bread, a Potion of Mana, a Potion of Minor Healing, three Rat Rations, two Empty Flasks and Crimsonspire Berries, with the crates beside them holding an Ironhide Potion, two Potion of Minor Mana and more bread. A second alcove down in the south-west hides Amberrose, two Moonpetal, a Voidshard, an Empty Flask and a ready-made Ghoststep Draught.
Jacob in his cell
In the middle of the level you'll find Jacob chained in a cell. Interact with him to free him. That closes Shadows of the South and starts Heart of the Source. You can head straight back to Khelebar for the reward, but if you bound Ixarion in the mausoleum, leaving the underground ends his help. Jacob's Hand Axe also shows up around this conversation; who hands it to whom we can't confirm.
Three flames and the hidden walls
Near Jacob's cell stand green, ordinary and blue flames beneath an inscription about a false fire. Extinguish the blue flame to open the secret wall to its south. A wrong choice can summon The Faded. This is a mechanism on this level; we have not confirmed that it is the same blue flame that operates a gate on the approach to the prison.
There's more than one hidden route here. In the south-west a lever opens a secret wall to the east, and in the northern corridor a hidden button reveals a wall leading to a chest with the Recipe: Ghoststep Draught and the Belt of Major Evasion. Another chest in the middle of the level holds the Belt of the Marksman, a Potion of Poison, a Potion of Healing and an Ironhide Potion. A coffin on an altar mid-level contains a Potion of Resurrection, and a northern coffin the Shield of Lethander – the one with the potion releases an enemy when opened, so don't crack it mid-fight.
The hall of braziers
On the way east you pass a hall of burning braziers with a sign telling you to let no flame burn your soul. The braziers here stay lit, and the task is to reach the far door across the free tiles between them. Step on a brazier and the door to the north closes. We don't have the full tile-by-tile route confirmed, so at each junction turn and check the next tile before you commit.
Thalric and the second Golden Key
Thalric the Undying Flame waits in the south-eastern corner. While all four green braziers in his chamber burn you can't hurt him, so work your way round and put them out, smash blocking breakables with melee attacks, and keep healing as you go, because Thalric chases you around the room. Expect Paralysis too. With the last fire out, finish him: he drops the Golden Key of Thalric, the Staff of the Archmage and a Crimson Ring.
After the fight, search the chamber too. Its tables hold Cheese, a Voidshard, a Potion of Healing and two Potion of Mana; the chest contains the Hat of Fire, a Wolf Skull and an Emerald. The headless statue in western Caerlin Woods also needs the Wolf Queen's head from Thalric's chest. We have not confirmed that it is the item named Wolf Skull, so keep the chest contents rather than selling them.
The northern exit leads into The Silent Chambers for the third key. Once you hold the Golden Keys of Maltherion, Thalric and Zerethic, come back here and use them in the three locks of the Source Gate – and don't confuse them with the four Runic Segment keys for Underkeep Tower.
Beyond the Source Gate
Return with all three Golden Keys to open the Source Gate. Beyond it, in Chambers of Endless Sleep, light the single brazier nearest the entrance and the four forming a square before the iron doors. Leave every other brazier unlit. If the doors stay closed, check that you have a two-by-two square rather than four fires in a row, with no extra flames elsewhere.
After defeating the Source Guardians, you can speak to the Source. Make a separate save before deciding: End it destroys the Source and fulfils that objective, while Let it live preserves it and fails Heart of the Source. After destroying it, search the chest for the first Runic Segment Key for Underkeep Tower. A switch behind the chamber's banners opens a return shortcut. Then report to Khelebar and visit Jacob for his later reward.