
Caerlin Woods
Map: Caerlin Woods
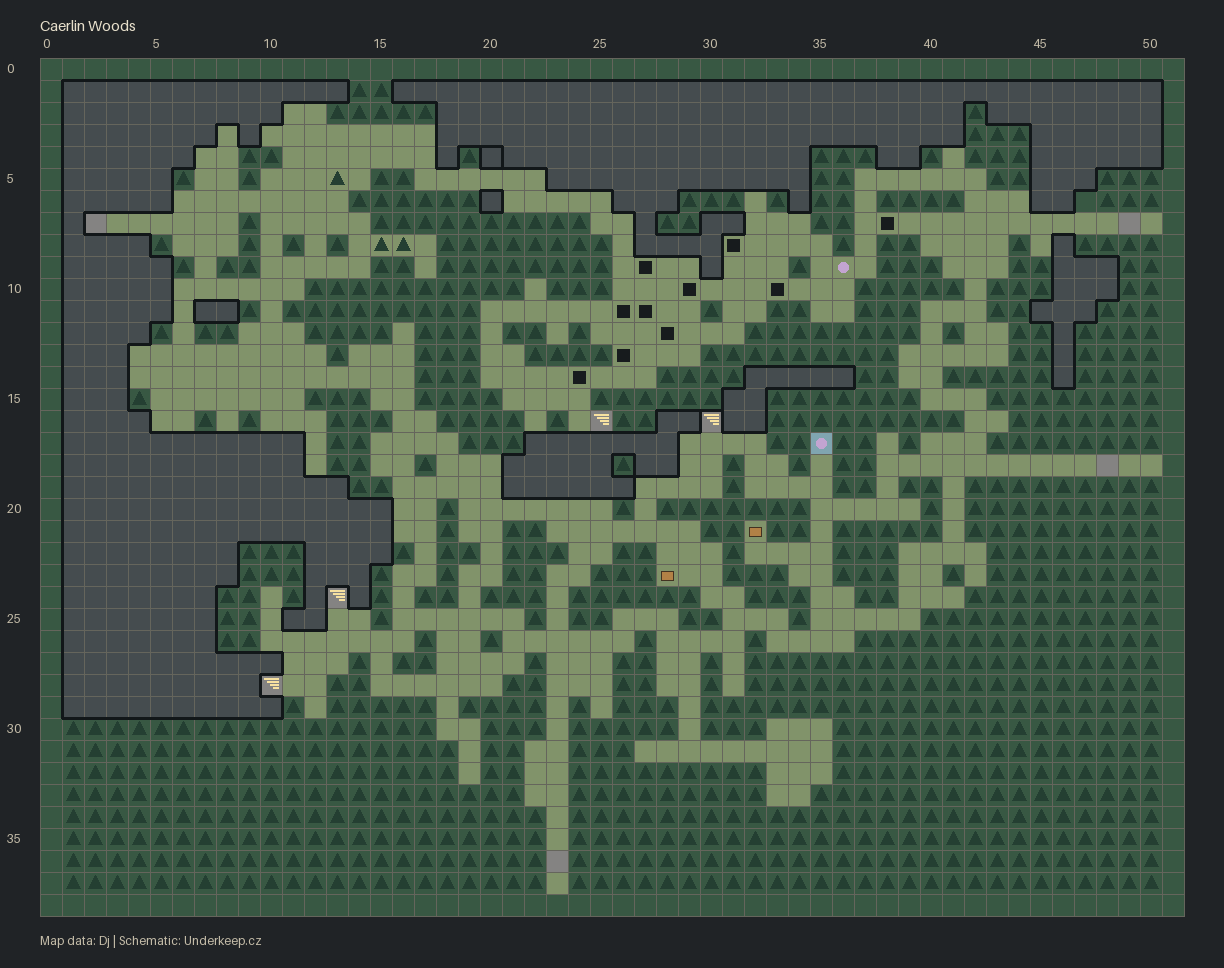
Caerlin Woods ties the village in the south to everything that lies north, west and east of it. You arrive along the southern edge, and from there the forest spreads east towards Grimfen, west to the statue and the way into Duskhollow Woods, and down into four separate underground areas. A signpost right by the arrival point points south to Underkeep and east to Grimfen, and north-east of it there's a Waystone for fast travel. Activate it on your first visit – you'll be coming back here a lot. A little east of the Waystone there's also a resurrection shrine, worth a note on your map.
Mind the pits and traps
In the middle of the forest, where a pack of Huntclaws roams, hidden pits sit between the trees. Falling in drops you straight into the Wolf Lair, where a much larger pack is waiting, so don't push through here with a battered party. A hidden hunting trap lies a little further east, and in the south of the woods Burrowers move under the ground and have to be allowed to surface before you can hit them.
Along this stretch you can find a Garnet and coins on the floor, and a dead adventurer carrying Ironveil Armor, the Cloak of Ironveil, a Bloodstained Letter, potions and coins. Another dead man further west has a Dagger and Michael's Last Note on him.
Ways underground
Several separate areas lead down from the forest, and each one goes somewhere different. In the middle, the entrances to the Wolf Lair and the Basilisk's Den sit side by side. In the south-west, Gravewood Crypt opens up with miner footprints visible in the mud leading to it, and a little further south again is the entrance to Blightvein Mine. The search for the missing miners continues into the mine; the crypt is an optional detour, footprints or not. There's loot on both approaches: a Marksman Signet by the crypt entrance, and a barrel by the mine with an Apple, Moldy Bread, a Potion of Minor Stamina, the Recipe: Potion of Cure Poison and an Empty Flask.
Two crossings lead east into Grimfen, one in the north and one lower down, with more signposts pointing the way. A hidden route near the teleport gate also leads towards Grimfen; whether that gate is the Waystone here, and the exact tile, we can't confirm. The western edge belongs to the statue of Caerlin with her wolves: it stands headless until you fit the Wolf Queen's head from Thalric's chest in Cells of the Forgotten, and once restored you can kneel before it for a blessing that raises armour against animals for 500 turns. The passage into Duskhollow Woods continues beside it. A set of Hardened Armor lies on the ground not far away.
Optional encounters
The old cemetery in the north-west wakes up as you approach: The Faded rise from the graves. Out east, an Echo spirit stands among the trees, visible only with Echo Sight.
An old well sits in the north, and it can go several ways. Drop a stone in and a Wrathspinner climbs out. Tossing coins is a bottomless sink: the voice keeps asking for more and gives nothing back. What does pay off is inspecting the rim with a pickaxe, which frees a loose stone with 8 coins hidden behind it.
The Whispering Tree in the north-west asks you to carve Michael's name. It's a trap. Read Michael's Last Note from the dead man in the middle of the forest first, examine the names on the trunk, then carve your own: that gives you Sap's Endurance and 100 XP.
In the south, an altar holds two chalices. Put ten coins into the golden one, then drink from whichever chalice begins to glow. The reward is described both as a positive mutation with 100 XP and as a chameleon skin buff for one character; we have not confirmed their exact equivalence. A wrong offering can wake a Witherwood Dryad.
That leaves two chests. One in the south-east holds a Thunder Amulet; the other nearby is locked and needs Lockpick Tools, with the Recipe: Wardstone Elixir, random loot and 9 coins inside. Further south you'll find fresh wolf tracks in the mud, slipping away between dense trees.